1. Context and requirements
Recently, a client had the need to enable users to register/login without an email on a platform built upon the .NET stack using ASP.NET Identity. The scenario is easy to understand: Most of your target users won’t have an email account but they will have a phone number available.
The requirement then is also simple:
We need to enable users to sign up and login using their phone number. That way, users that don’t have an email account can make use of their phone numbers to access securely the platform.
2. The Problem
One of the first things I tried was to play with the configuration of ASP.NET Identity. I found some threads like:
- – https://stackoverflow.com/questions/44480653/register-and-login-by-phone-number-in-asp-net-core-identity
- – https://social.msdn.microsoft.com/Forums/en-US/c0691f47-e3e9-4f73-b8a2-c083d8d304cb/identity-login-with-mobile-phone-number
- – https://techbrij.com/asp-net-core-identity-login-email-username
None of them were really matching the requirements I need. Basically, most of them are pointing you in the direction of using two factor authentication as a mechanism to accomplish phone register/login. But the requirements from the client are that we need to not disrupt the email register/login features, we just need to enhance those features so that a user with no email address can simply use his phone number as a replacement for an email account.
And after some time trying to find an existing solution with no good results, I decided to start reviewing the possibility of extending ASP.NET Identity to add some new capabilities that could address the client needs.
3. Analyzing the impact of the changes
As already stated on the title of this post, we’re already taking advantage of the benefits of ASP.NET Core Identity.
So how can we accomplish this? Should we hack some methods? Let me try to summarize the main use cases that will be affected by this change:
User sign up
– User provides an email/phone number and password
– A confirmation link is sent to the email/phone number
– User needs to click on the link to complete the sign-up process
User login
- – User provides an email/phone number and password
4. Overall solution
We will refer to the users using their phone to access the platform as “Phone users” and we will divide the solution in steps:
- Create a specialization class of Microsoft.AspNetCore.Identity.UserManager
- Prepare our new class to Generate Confirmation Tokens for Phone Users
- Prepare our new class to Confirm the identity of Phone Users
4.1 Create a specialization class from Microsoft.AspNetCore.Identity.UserManager
namespace WebApp1.Identity
{
public class ApplicationIdentityUserManager : UserManager<IdentityUser>
{
public ApplicationIdentityUserManager(IUserStore<IdentityUser> store,
IOptions<IdentityOptions> optionsAccesor, IPasswordHasher<IdentityUser> passwordHasher,
IEnumerable<IUserValidator<IdentityUser>> userValidators,
IEnumerable>IPasswordValidator<IdentityUser>> passwordValidators, ILookupNormalizer
keyNormalizer, IdentityErrorDescriber errors, IServiceProvider services,
ILogger<UserManager<IdentityUser>> logger) : base(store, optionsAccesor, passwordHasher,
userValidators, passwordValidators, keyNormalizer, errors, services, logger)
{
}
}
}
Remember we don’t want to simply do some hacks, we want to extend ASP.NET Identity features so that it allows us to have Phone Users as first class citizens.
Now, we want to use our new UserManager implementation everywhere, that’s why we will add it on the ConfigureServices method.
public void ConfigureServices(IserviceCollection services)
{
services.AddDbContext<ApplicationDbContext>(options =>
options.UserSqlite(
Configuration.GetConnectionString("DefaultConnection")
));
services.AddDatabaseDeveloperPageExceptionFilter();
services.AddDefaultIdentity<IdentityUser>(options =>
options.SignIn.RequireConfirmedAccount = true)
.AddUserManager<ApplicationIdentityUserManager>()
.AddEntityFrameworkStores<ApplicationDbContext>();
services.AddRazorPages();
}
ASP.NET Identity is flexible enough to let you change the default User Manager with a custom one. In this case, we’re specifying which class will be used as the User Manager using: .AddUserManager<ApplicationIdentityUserManager>()
4.2 Prepare our new class to Generate Confirmation Tokens for Phone Users
We will add the following code to our custom UserManager class:
public const string ConfirmPhoneTokenPurpose = "PhoneConfirmation";
public Task<string> GeneratePhoneConfirmationTokenAsync(IdentityUser user)
{
ThrowlfDisposed();
return GenerateUserTokenAsync(user, Options.Tokens.ChangePhoneNumberTokenProvider,
ConfirmPhoneTokenPurpose);
}
Now, let’s pause to explain what we’re doing here. ASP.NET Identity already includes logic to generate email confirmation tokens (GenerateEmailConfirmationTokenAsync). That method returns a very long code that needs to be sent to the user somehow so that the user can confirm his identity.
In the case of Phone Users, we will reuse some existing logic to take care of confirming their account. The method responsible of generating confirmation tokens is GenerateUserTokenAsync which receives 3 parameters, the User entity, the token provider and the purpose of the token.
In our case, what we’re doing is that we will be reusing the token provider used to generate tokens when a user is changing his phone number. Why? Because that token provider will generate a short confirm token instead of the long one for emails.
Internally, the User Manager class is storing the tokens as well as the purpose of those tokens. So, what we’re doing here is that we are adding the ability to our User Manager class to generate phone confirmation tokens and those will exist for the purpose of “PhoneConfirmation”. We will use that token later.
What about the ThrowIfDisposed()? If you look at the implementation of the original UserManager class, that’s normally used on most of the methods of the class, so we’re simply following the pattern and logic here.
We will also create a method that takes care of generating the right confirmation code depending on the Username:
public async Task<string> GeneratePhoneConfirmationTokenAsync(IdentityUser user)
{
if (user.UserName.Contains("@"))
{
return await GenerateEmailConfirmationTokenAsync(user);
}
return await GeneratePhoneConfirmationTokenAsync(user);
}
4.3 Prepare our new class to Confirm the identity of Phone Users
One of the features ASP.NET Identity provides is the ability to configure if you need users to confirm their identity, which works great. The only issue there is that we don’t have a way to tell ASP.NET Identity that a user can have a confirmed account whenever his Phone Number has been confirmed.
That’s why we need to include that scenario.
public async Task>IdentityResult> ConfirmPhoneAsync(ApplicationUser user, string token)
{
ThrowIfDisposed();
ThrowIfUserIsNull(user);
if (!await VerifyUserTokenAsync(user,
Options.Token.ChangePhoneNumberTokenProvider, ConfirmPhoneTokenPurpose, token))
{
return IdentityResult.Failed(IdentityErrorDescriber.InvalidToken());
}
var store = GetPhoneNumberStore();
await store.SetPhoneNumberConfirmedAsync(user, true, CancellationToken);
return await UpdateUserAsync(user);
}
With this method we’re simply doing the same check the framework already does for emails, but we’re working with tokens created for “PhoneConfirmation”. This is a good summary of what we’re doing here:
- Check that the user has a matching token for “Phone Confirmation”
- If it is valid, then let’s update the PhoneNumberConfirmed field to true (Indicating that we have confirmed the user Phone Number)
That’s basically the whole purpose of this method. We’re adding a way to confirm the identity of Phone Users. But we’re still missing something, ASP.NET Identity doesn’t consider PhoneNumberConfirmation field when determining if a user has a confirmed account.
ASP.NET Identity also provides a way to customize the way we determined if a user has already confirmed his account. We will implement the IUserConfirmation interface to handle this:
using Microsoft.AspNetCore.Identity;
using System.Threading.Tasks;
namespace WebApp1.Identity
{
public class ApplicationUserConfirmation : IUserConfirmation<IdentityUser>
{
public async Task<bool> IsConfirmedAsync(UserManager<IdentityUser> manager,
IdentityUser user)
{
if (user.UserName.Contains("@"))
{
return await manager.IsEmailConfirmedAsync(user);
}
else
{
return await manager.IsPhoneNumberConfirmedAsync(user);
}
}
}
}
The interface is meant to implement a single method: IsConfirmedAsync. So, we are adding an additional check to the original implementation. We want Phone Users to be treated as first-class citizens here. So whenever there’s a Phone User with a Confirmed Phone Number, that user has a confirmed account. It is as valid as an account confirmed by email.
Let’s not forget to hook our ApplicationUserConfirmation class into the ASP.NET Identity logic: .AddUserConfirmation<ApplicationUserConfirmation>().
5. What’s missing? Bonus
With all this you’re ready to just plug-in your new ApplicationUserManager and ApplicationUserConfirmation classes to your project. So, let me give you a bonus.
If you’re using ASP.NET Identity (and you created the project without any specific front-end) you probably realized that Identity already provides logic to handle several pages on your project. Pages like: Login, Register, ChangePassword, etc. But you don’t see those on the project. I don’t know why they decided to hide those details by default since most of any real implementations will require to customize those views. So, how can you have access to those?
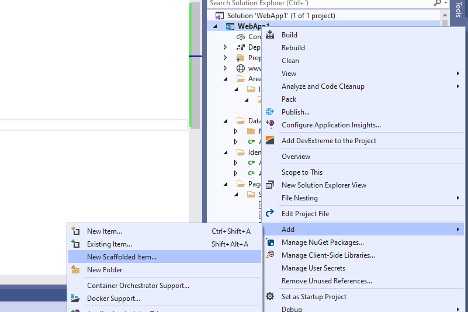
You need to Scaffold some items.
| 1. Right click on your project and navigate to the following option: |
 |
| 2. On the next dialog select “Identity” and then click Add |
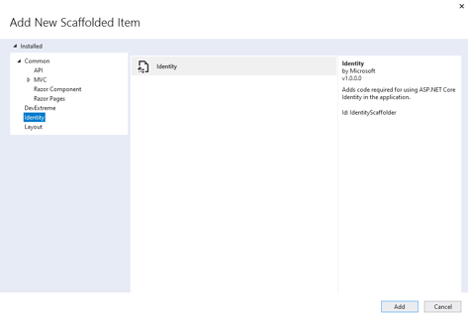 |
| 3. Then you will be presented to a list of possible views to override: |
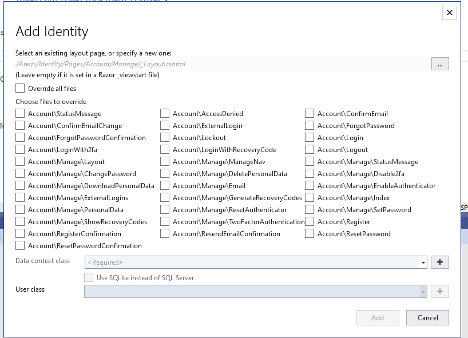 |
| 4. For this article, we will be focusing on the following:
a. AccountRegister b. AccountConfirmEmail |
| 5. After clicking “Add”, you may need to wait a few seconds for the items to be generated. When the process is done, you should see something like this: |
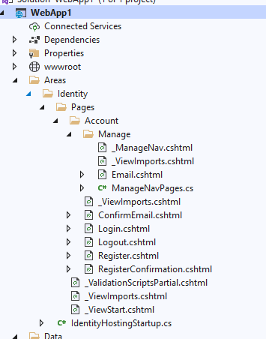 |
5.1 Generating confirmation codes for email or phone number
Now, let’s look at one of those Page Models. If you open Register.cshtml.cs you will see the following:
public async Task<ActionResult> OnPostAsync(string returnUrl = null)
{
returnUrl ??= UrI.Content("~/");
ExternalLogins = (await _signInManager.GetExternalAuthenticationSchemesAsync()).Tolist();
if (ModelState.lsValid)
{
var user = new IdentityUser { UserName = Input.Emall, Email = Input.Email };
var result = await _userManager.CreateAsync(user, Input.Password);
if (result.Succeeded)
{
_logger.LogInformation("User created a new account with password.");
var code = await _userManager.GenerateEmailConfirmationTokenAsync(user);
code = WebEncoders.Base64UrlEncode(Encoding.UTF8.GetBytes(code));
var callbackUrl = Url.Page(
"/Account/ConfirmEmail",
pageHandler: null,
values: new { area = "Identity", userld = user.Id, code = code,
returnUrl = returnUrl },
protocol: Request.Scheme);
await _emailSender.SendEmailAsync(Input.Email, "Confirm your email", $"Please confirm your account by <a
href='{HtmlEncoder.Default.Encode(callbackUrl)}'>clicking here</a>.");
if (userManager.Options.SignIn.RequireConfirmedAccount)
{
return RedirectToPage("RegisterConfirmation", new { email = Input.Email, returnUrl = returnUrl });
}
else
{
await _signInManager.SignInAsync(user, isPersistent: false);
return localRedirect(returnUrl);
}
}
foreach (var error in result.Errors)
{
ModelState.AddModelError(string.Empty, error.Description);
}
}
// If we got this far, something failed, redisplay form
return Page();
}
We will plug our functionality by using our brand new UserManager class whenever is needed. Pay attention to the following line:
var code = await _userManager.GenerateEmailConfirmationTokenAsync(user);
That line is responsible for creating the right code to be sent inside an email to the user being registered. We will change that so that it uses our method: GenerateConfirmationTokenAsync. Remember that method we created will check the user.Username to determine if the user is using his email as Username or his phone number.
var code = await _userManager.GenerateConfirmationTokenAsync(user);
You’re now generating confirmation tokens based on User’s username. And you will be able to confirm that identity by using the method: ConfirmIdentityAsync.
5.2 Confirm Identity of user either by email or by phone number
If you open the ConfirmEmail.cshtml you will see the following:
public async Task<IActionResult> OnGetAsync(string userId, string code)
{
if (userId == null || code == null)
{
return RedirectToPage("/Index");
}
var user = await _userManager.FindByAsync(userId);
if (user == null)
{
return NotFound($"Unable to load user with ID '{userId}'.");
}
code = Encoding.UTF8.GetString(WebEncoders.Base64UrlDecode(code));
var result = await _userManager.ConfirmEmailAsync(user, code);
StatusMessage = result.Succeeded ? "Thank you for confirming your email." :
"Error confirming your email.";
return Page();
}
Again, instead of using:
var result = await _userManager.ConfirmEmailAsync(user, code);
We should use:
var result = await _userManager.ConfirmIdentityAsync(user, code);
And behind the scenes, our User Manager class will take care of confirming the identity depending on the username type. After a Phone User has come through the process of confirming his identity, he will be able to sign in properly since he has a confirmed account. And since we register our new ApplicationUserConfirmation, then ASP.NET Identity will consider an account confirmed whenever the user confirmed his identity by email or by phone number. We have Phone Users as first-class citizens now.
Don’t forget the other details
The purpose of this article was to present you a straight-forward way to implement Phone Users as first-class citizens, but I haven’t covered some important details that might be up to you, for instance:
- – Frontend modifications to support Phone login/register
- – Modifications to models so that Username can be a Phone Number or Email
- – Implementation of SMS sender
- – Multifactor authentication with phone but no email
Need help with your upcoming software project?
At Unosquare, we train our developers, Scrum Masters, QA Experts, and business analysts on the Agile Philosophy of software development. The principles of adaptability and collaboration are the keys to success for the kind of rapid software development produced with our distributed teams.
By focusing on communication, feedback, and flexibility, our Agile teams produce working results, frequently focus on the highest-priority features, and make continuous, meaningful progress on software projects. To learn more about what Unosquare can do for your organization, check out our blog