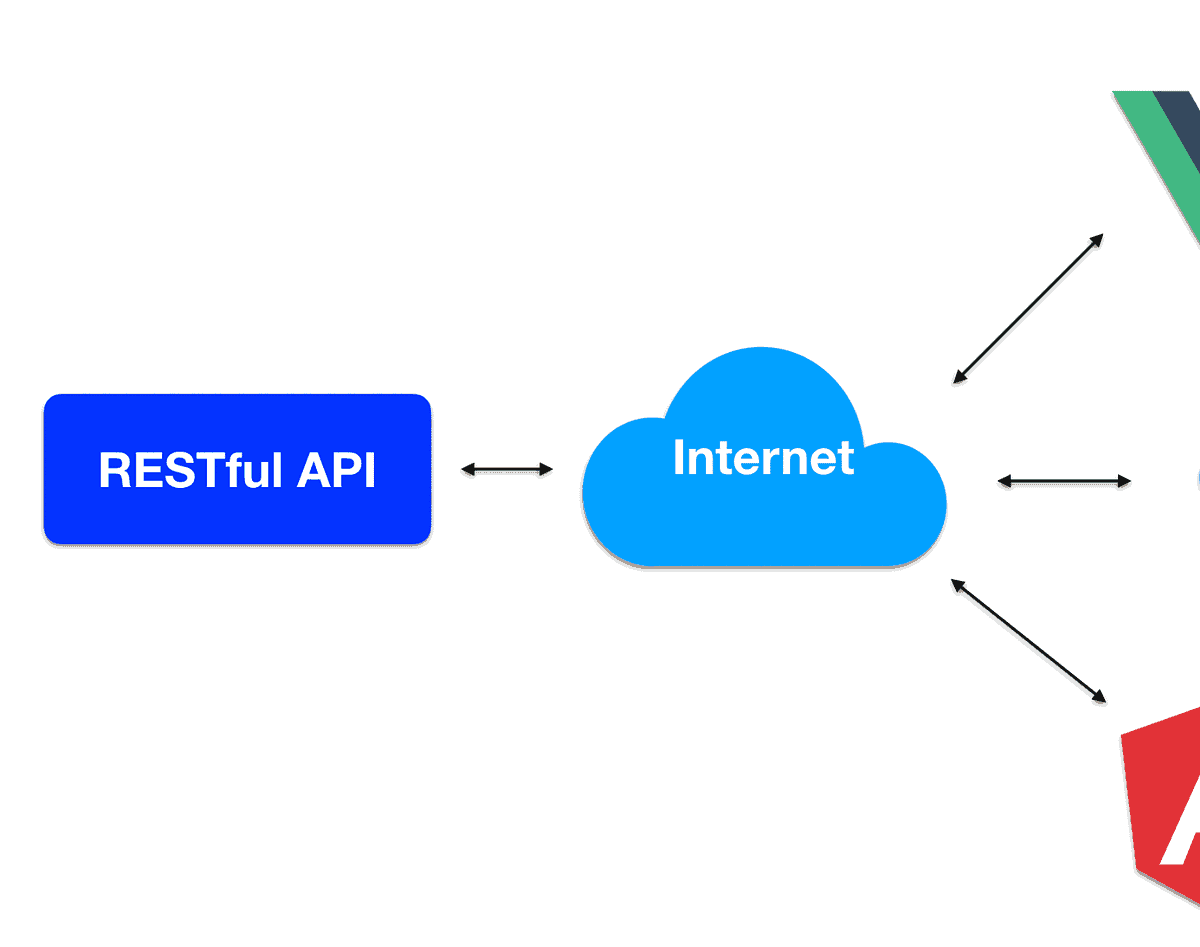
We are now at the stage where we can work with our UI applications. The goal is to create three UI applications that consume our RESTful API (CRUD operations) using some of the most popular UI frameworks/libraries
UI apps
Users list view: (GET users, DELETE user by Id)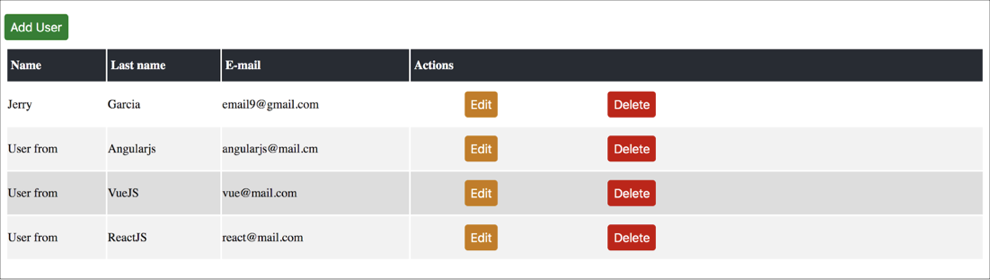 Add User view: (POST User)
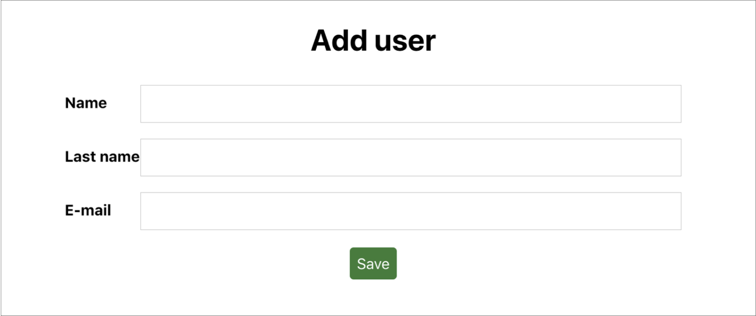
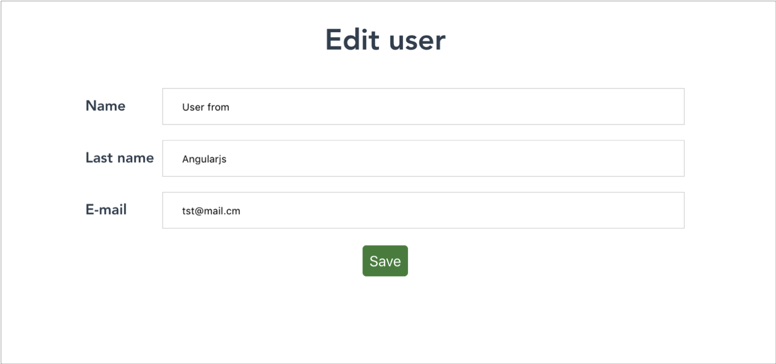
 Edit User view: (PUT User:)
AngularJS
Maintained by Google, AngularJS is one of the most popular UI frameworks available. In its official page, the description of Angular states:
“AngularJS is a toolset for building the framework most suited to your application development. It is fully extensible and works well with other libraries. Every feature can be modified or replaced to suit your unique development workflow and feature needs.” Required: NodeJS 8.11+ Npm v6.9+ AngularJS 1.7+ To start our AngularJS application We’ll be using the Yeoman generator for AngularJS. So, we have to install locally the next dependencies: $> npm install -g grunt-cli bower yo generator-karma generator-angular Create a new directory for your app and navigate to it. Now run this command to create the structure for our angular app $> yo angular ourApp Enter N when asked to use Gulp and Sass. We won’t be using these as part of this application. Enter Y (or just hit enter) for including bootstrap. Then hit enter again to include the selected modules. Your AngularJS application framework will start building in your system. Once your command prompt comes back your sample AngularJS application is done building. Run the following command to start your application server using Grunt. $> grunt serve Your application should pop up into a browser or you can get to it by going to: http://localhost:9000/#!/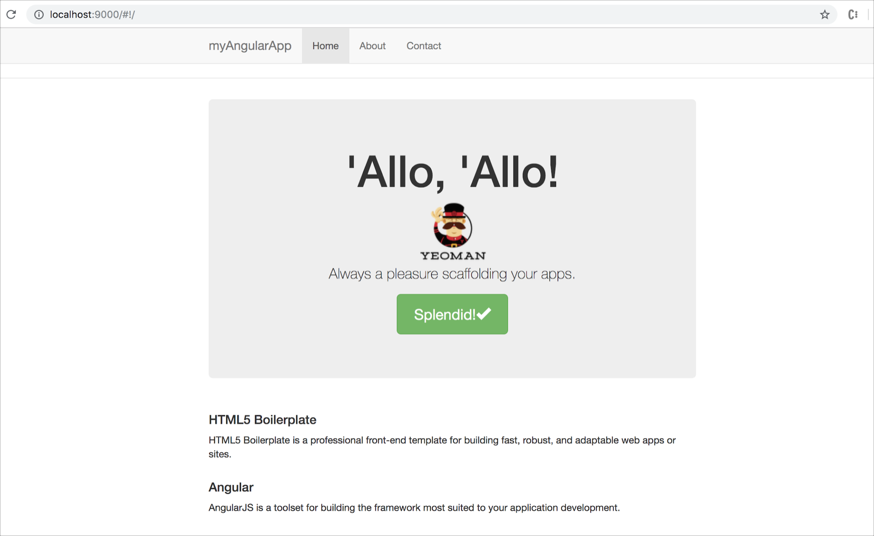 This is the project structure:
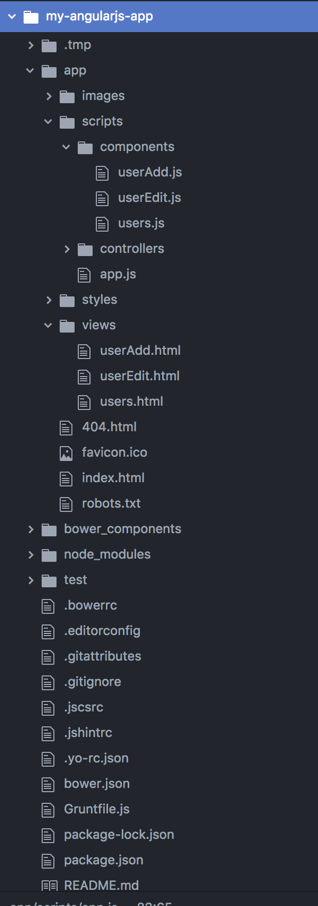
 AngularJS allows you use MVC design pattern through Controllers, Views and Models. Since version 1.5, we can use Components, let’s take this approach.
As you could see, we defined three components in our app routes configuration, appUsers, userEdit and userAdd.
In our AngularJS application, the main script is:
AngularJS allows you use MVC design pattern through Controllers, Views and Models. Since version 1.5, we can use Components, let’s take this approach.
As you could see, we defined three components in our app routes configuration, appUsers, userEdit and userAdd.
In our AngularJS application, the main script is:
https://github.com/jerrydevelopermx/my-angularjs-app/blob/master/app/scripts/app.js
In this file we: Define the dependencies that will be used in our application. (Lines 10-19) Define a CONSTANT value that contains our API URL. (Lines 22-24) Define our application routes. (Lines 26-42) appUsers Componenthttps://github.com/jerrydevelopermx/my-angularjs-app/blob/master/app/scripts/components/users.js
Define component view in templateUrl string (Line 5) We inject our APP constants object to be used on our API requests (Line 6) Create save() function where we use POST request of AngularJS $http api. (Lines 11-17) editUser Componenthttps://github.com/jerrydevelopermx/my-angularjs-app/blob/master/app/scripts/components/userEdit.js
In this file we: Define component view in templateUrl string (Line 5) We inject our APP constants object to be used on our API requests (Line 6) Create getData() function where we use GET request of AngularJS $http api passing UserId to get User information (Lines 13-17) Create save() function where we use PUT request of AngularJS $http api. (Lines 19-25) And in the end, this is the result: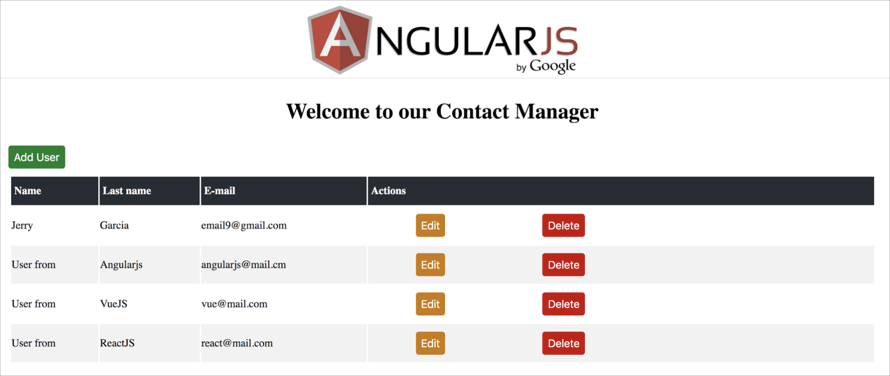
ReactJS
React JS is a javascript library to build UI interfaces based on components approach. Maintained by Facebook, React is described: “React makes it painless to create interactive UIs. Design simple views for each state in your application, and React will efficiently update and render just the right components when your data changes.” Required: NodeJS v8.11+ Npm v6.9 + First, we have to install the package create-react-app in your local environment: $>npm install -g create-react-app Now, you can create your first react basic app: $>create-react-app your-app-name Go to your created project folder: $>cd your-app-name Start your application: $>npm start You will now see something similar to this image: React JS is a component based library, so we have to use this approach.
Important notes:
React introduces a new HTML rendering strategy: JSX.
JSX allows us to write HTML elements in JavaScript and place them in the DOM without any createElement() and/or appendChild() methods.
JSX converts HTML tags into react elements.
Now, let’s go to the code…
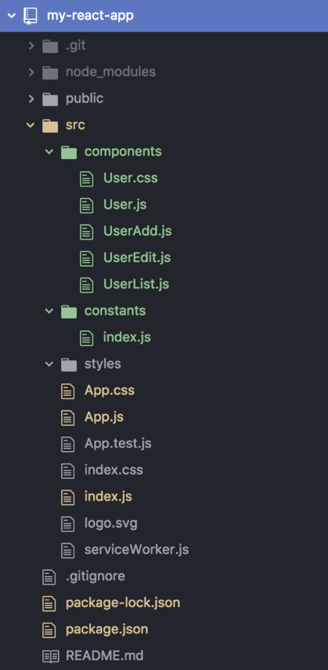
This is the project structure:
React JS is a component based library, so we have to use this approach.
Important notes:
React introduces a new HTML rendering strategy: JSX.
JSX allows us to write HTML elements in JavaScript and place them in the DOM without any createElement() and/or appendChild() methods.
JSX converts HTML tags into react elements.
Now, let’s go to the code…
This is the project structure:
 The main script of our application will be:
https://github.com/jerrydevelopermx/my-react-app/blob/master/src/index.js
And, now, let’s see what we have in this file: We define all our dependencies (Lines 1 -12) We set the application’s routing configuration (Lines 15-29) We render our routing config and we added to HTML element present in index.html (Line 31) Before we continue, we must define our application CONSTANTS configuration:https://github.com/jerrydevelopermx/my-react-app/blob/master/src/constants/index.js
App Component:https://github.com/jerrydevelopermx/my-react-app/blob/master/src/App.js
This is our main/home component (as defined in Routing): We import required dependencies (Lines 1-5) Define App class component (Line 7) We get users information using axios (promise based HTTP client to make requests) and set them into state users object and send it to UserList component into componentDidMount component lifecycle(Lines 13-36) We send state users data to userList component through render() component fase (Lines 38-44) UsersList component:https://github.com/jerrydevelopermx/my-react-app/blob/master/src/components/UserList.js
Points to catch: We use a constructor function, to get props sent to our component, in this case, User information (Lines 7-9) addUser(e) function that redirects us to usersAdd component (Lines 10-12) render() function that gets our JSX content. Add user button calling our addUser function (Line 16) Map function to send User info to User Component (Line 27) User Component:https://github.com/jerrydevelopermx/my-react-app/blob/master/src/components/User.js
Let’s see this file: We have an updateUser(id) function that redirects us to editUser component (Line 14) We have a deleteUser(id) function that makes a DELETE request using axios HTTP Client (Lines 16-25) render() function that gets our JSX (HTML) content. (Lines 27-37) Edit User Component:https://github.com/jerrydevelopermx/my-react-app/blob/master/src/components/UserEdit.js
Here we have: At bottom of document, our render() function with our JSX content (Lines 43-72) ComponentDidMount() function where we use an axios GET request to query or user by Id. (Lines 35-42) Save() function where we make a PUT request with axios to update our user. (Lines 24-34) A handleChange() function that manages changes in User object and update application estate with our User object. (Lines 17-24) Add User Component:https://github.com/jerrydevelopermx/my-react-app/blob/master/src/components/UserAdd.js
In this component we have almost the same functions than in editUser component, the differences: Save function have a POST request to API with axios instead a PUT (as in Edit User component) (Lines 23-33) We don’t need ComponentDidMount() function to get data, since is a new User component In the end, we have our resulting application like this: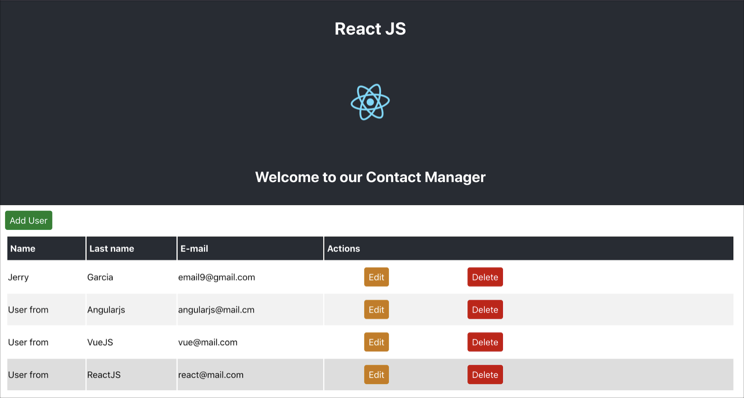
VueJs
Simply stated, VueJs is:
“An incrementally adoptable ecosystem that scales between a library and a full-featured framework”
In this case, we have to use the components approach Required: Node JS v8.11+ Npm v6.9+ To start, you will need the vue-cli package. To install it: $>npm install -g vue-cli Next, you need to initialize your project: $>vue init pwa my-vue-app Next, $>cd my-vue-app $>npm install $>npm run dev You’ll see the following when you go to: localhost:8080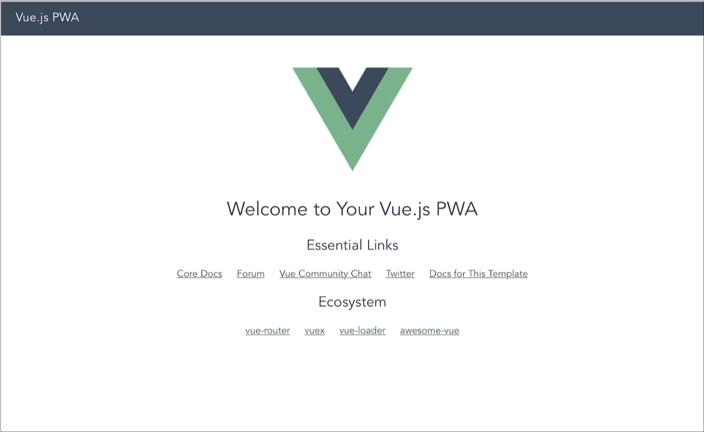 Vue JS also uses a Component pattern approach. In this case, we don’t use JSX (as React) or simple HTML (As AngularJS).
VueJS uses a different views approach, so you have to wrap your HTML content into <template> tags in your component.
Another thing to point is that each component must be saved with .vue extension. And you will also see we have <style> tags with CSS classes inside each component.
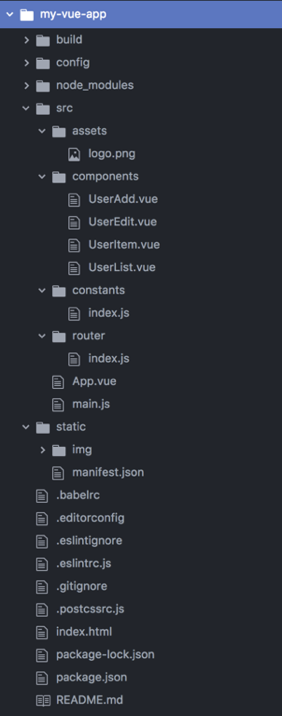
This is our final project structure:
Vue JS also uses a Component pattern approach. In this case, we don’t use JSX (as React) or simple HTML (As AngularJS).
VueJS uses a different views approach, so you have to wrap your HTML content into <template> tags in your component.
Another thing to point is that each component must be saved with .vue extension. And you will also see we have <style> tags with CSS classes inside each component.
This is our final project structure:
https://github.com/jerrydevelopermx/my-vue-app/blob/master/src/main.js
In our main.js script we start our application, you can see: We import all required dependencies in this script (Lines 3-5) We define our new Vue app (Lines 10-15) App component:https://github.com/jerrydevelopermx/my-vue-app/blob/master/src/App.vue
Our App.vue Component is our base component that will display all others through <router-view> We define out HTML template (Lines 1-11) We define our component functionality wrapped in <script>> tags (Lines 14-17) We define our CSS styling inside <style> tags (Line 19-54) Routing:https://github.com/jerrydevelopermx/my-vue-app/blob/master/src/router/index.js
We define our routes array (Lines 10-29) CONSTANTS: https://github.com/jerrydevelopermx/my-vue-app/blob/master/src/constants/index.js UserList component:https://github.com/jerrydevelopermx/my-vue-app/blob/master/src/components/UserList.vue
Points to see: We are adding <UserItem> component, iterating with over users array and passing it to component (Line 16) In created() function we are getting our users through an Axios (yes, axios again) GET request to our API. (Lines 49-59) We define a methods object that contains all the functions we’ll need in our component. (Lines 43-47) We add a data() function where we’ll have our vars definitions (Lines 36-42) We define a components object that contains our needed components (Lines 33-35) A very long content where we define our CSS (Lines 61-105) User Component:https://github.com/jerrydevelopermx/my-vue-app/blob/master/src/components/UserItem.vue
Points to consider: We define methods for editUser(redirecting to editUser component) and deleteUser(to make a DELETE request to our API) (Lines 26-40) We define a props object to handle data sent to out components via props. (Lines 20-25) User Edit componenthttps://github.com/jerrydevelopermx/my-vue-app/blob/master/src/components/UserEdit.vue
Points to note: We get param id into props object definition (Line 36) In out methods object, we define saveUser() where we make a PUT request through Axios (Line 37-49) We define data() function with our User object definition (Lines 50-55) In created() function we make a GET request to the API with our user id to get his information (Lines 56-67) User Add componenthttps://github.com/jerrydevelopermx/my-vue-app/blob/master/src/components/UserAdd.vue
In this file: Our saveUser() function makes a POST request to API instead a PUT request (as in editUser component (Lines 37-47) In data() function we only define our user object attributes (Lines 49-57) And, this our result: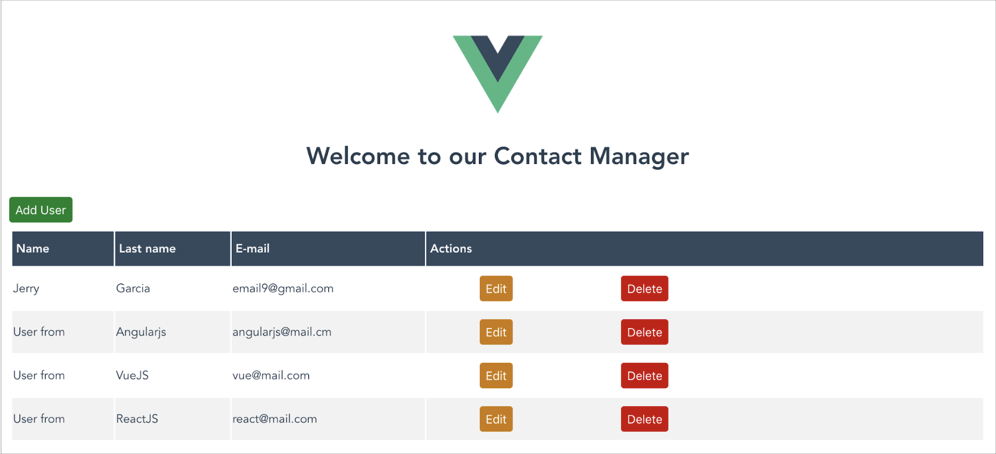
Conclusions
After we have worked into our applications development, we have some interesting conclusions. First, I want you to see how easy was for us to create a simple API that implements the most common HTTP methods (GET, POST, PUT, DELETE) using Java EE, Jersey, MySQL, JPA and Glassfish Server. This is only one of several approaches, we could use SpringBoot, with Hibernate as ORM, Tomcat, Weblogic, JBoss as servers and Oracle, MSSQL Server as DBMS and so on. Second, we experienced how three of the most popular Javascript UI Frameworks/Libraries work (AngularJS, React JS, Vue JS). Each one has its own architecture and its own implementation oriented to the same: create UI lightweight, powerful, scalable and maintainable applications that doesn’t take care about data business logic or in some cases, data security management. Finally, I would like to emphasize how fast this methodology was in creating this “full stack” solution. We didn’t need to create three whole monolithic applications. We only created a “Back end” application (our API) that was exposed as a RESTful service. After that we just had to create our “Front end” applications to consume it. This way, it doesn’t matter which UI framework you need or want to use for consuming the API, you are free to implement whatever you want, just have to accomplish with API specification…and that’s it! Thanks for reading our series of posts. We sincerely hope you found them interesting and helpfulSource code
RESTful API:https://github.com/jerrydevelopermx/java-rest-jersey-api
Angular JS Application:https://github.com/jerrydevelopermx/my-angularjs-app
React JS Application:https://github.com/jerrydevelopermx/my-react-app
Vue JS Application:https://github.com/jerrydevelopermx/my-vue-app